This review is written by Jessica Cali @ Jessiicali – Words of a SAHM. I received one sheet of Jamberry Nail Shields to review! Jessica Cali is NOT responsible for the delivery or shipment of the prize!
Do you like fancy looking nails, but can’t afford acrylics? Always make a mess when using glue to put on press on nails, you can buy at Walmart? Well, how about no more mess, and no more throwing away your money for acrylics! Go check out Ashley Garnes – Jamberry Independent Consultant!. There are so many different designs that you have to choose from!
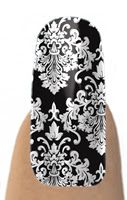
Ashley allowed me to review a set of shields from her, and she sent me the Black & White Damask. This design isn’t something I would have chosen for myself, I’m not much with the black nails, but once I got them on my fingers, I actually love how they look!
Here is a picture of my nails before I put them on! These go on so easily!
Here are the instructions that I followed in order to get these on (They can be found in any Jamberry Catalog, on the back of your sheet of shields, or on your Consultants website!
- Clean nails with nail polish remover or alcohol. (Clean, oil free nails are the most important steps of the application.)
- Cut and file nails to your desired length and shape.
- Buff the top of your nail & push back your cuticle.
- Match nail to the finger or toe that best fits.
- Peel off nail shield and warm with a blow dryer 10-15 seconds or until soft and flexible.
- When warm, press the shield onto the nail. Apply firm pressure around the edges to adhere shield to the nail. Use rubber cuticle pusher to seal the shield around the cuticle.
- Trim the top with scissors and file off remaining shield using a downward motion to remove excess.
- Apply heat and pressure to the shield again until it is sealed to the nail. (Repeating this step several times helps create a tight seal to the nail surface and increases wear time.)
- Optional; For active users, you can add a small amount of nail glue to the free edge to better seal the nail shield.
How to remove; Use hair dryer to heat for 15 seconds and slowly peel from nail!
Easy peasy, right!! I think so! And these also last for a while!! You definitely get more than 1 application from a sheet!! Here is what I started with…
And after putting the shields on both hands, here is what I have left!!
And of course, me being me, I had to do that picture upside down (I didn’t realize it until now!)
But they last a while!! You’re definitely getting your money’s worth for $15!!
You can also try to win $15 in credits to Ashley’s site! Just enter below on the Rafflecopter!!
This giveaway will run from June 9th until June 23rd! The winner will be chosen via the rafflecopter application, through random.org and the winner will have 24 hours to email me back.

so many favorites.. i like the onyx sparkle design..
My favorite is metallic camo.
black fluer de lis
I like everything, of course I like to paint my nails any chance I get, 🙂 , and the crazier the better. lol
city plaid
I love the metallic camo, my USAF hubby got a kick out of them too.
I like the leopard print!!
Pink & Blue Check
I like the colorful stars
Marin Mandrick
marin_jones@yahoo.com
Black Floral!
black floral!