First you want to blow up your balloon to the size you'd like. You'll also want to make the paste if you don't have any. To make the paste, you'll need about 1/2 cup flour and 1 cup water. Now put it in the microwave on 30 seconds. Do this between 2-3 times. Don't make it to thick though.
Now you want to get your paper towels out and start ripping or cutting them in smaller pieces. It doesn't really matter what size they are. Just make sure to cut them up in pieces. You can see from my pictures about the size I'd use.
Next you can start using the paintbrush to dip in the paste and cover the balloon in. Put the paper towel pieces all over the balloon. The paste will help it stick. Do a few layers of this too. Make sure to cover your final layer in the paste as well.
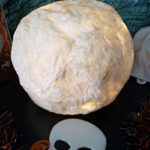
You now want to let it sit and dry for at least 24 hours. The time really depends on how big or small you made your moon. Mine took more than 24 hours, but yours could be less or even more.
Once you have let it dry, you can now take the pin and pop the balloon. Take the balloon out if you can, but if it got stuck and won't come out, that's okay too. Sometimes this could happen.
Now add in your lights. I personally love fairy lights, so that's what I wanted to use. I think they're the easiest to work with. You could always set down a flameless tea light and put the moon over it as well. I think the fairy lights look really nice though. You can take them inside too if you'd like. That's about all there is to it. A simple, yet fun moon lamp!